Try out different styles to find your own!

Exploring different styles helps you find YOUR style

One of the reasons that I am excited that Jose Garofalo arrives in Portland TODAY is that we will be working with historical and modern forms of tango this week. I feel that I improve my dance the most when I try new things.

As a social dancer, I like to have the ability to dance with all styles of tango. As a dance performer, I like trying out different versions of moves to see what I like best. As a dance historian, I love to learn vocabulary that dates back to famous teachers and eras of tango.

Jose and I have cooked up a series of classes that will give you a chance to experiment on each day of workshops.

Salon and Del Centro styles of tango

Come explore the world of turns Thursday 2/27 @ Om Studio, 14 NE 10th Ave. We will be doing a class on Salon style turns with sacadas at 7 PM. Then, we will do a contrasting style, Del Centro, looking at turns with enrosques and sacadas around 8:30 PM.

Most people in North America have learned from teachers of one of these traditional styles. A lot of you call the Del Centro style “milonguero” which means someone who dances in the milongas. “Del Centro” means the style that was prevalent in the center of town/downtown, and is a more accurate term :-) Salon style was danced outside of downtown.

Come expand your dance!

Milonga candombe vs. lisa and traspie

Saturday, 2/29 @ Shabu Studio, 6055 NE Glisan, at noon, we will explore milonga candombe! I am SUPER excited about this, as I love this and first studied with with Jose in Buenos Aires in 1999! Woohoo!

The next class, at 1:30 PM, will look at milonga lisa and milonga traspie. Don’t be afraid of these milonga styles: they are ALL fun, and Jose is fun, so YOU will have fun! It’s a chance to get more groovy and comfortable with your milonga. In my book, more milonga = better!

Vals on Sunday, then back to tango

3/1 @ Shabu Studio, 6055 NE Glisan, at noon, we will look at the Old Masters and vals. There is so much good “swing” in vals—come get your vals to really feel lovely and get in touch with the Old Masters. There are decades and decades of vals expertise for us to mine!

At 1:30 PM, we will have a class to look at creating your own dance. No, you don’t have to have come to all the classes to put together your own dance. If you have taken all the classes, you will have a lot more to play with, but this is for everyone. Come spend a chunk of time looking at your personal dance and what you want to incorporate into it, and why!

Come enjoy Jose at Las Naifas!

Las Naifas Milonga 2/28 Friday, 326 SW Broadway, Jose will be guest teaching and then revving up our party with his outgoing, party spirit! The lesson at 5:30 PM will be: Making cool moves fit on the dance floor. There is no need to not dance well just because a space is small! The cost for the lesson + milonga + 1st drink + snacks is $20—you can’t beat that!

Prices

Workshops: $30/1, $55/2, $80/3, $100/4, $115/5, $120/6 (The Las Naifas class is separate from the pricing; please pay at the door)


Privates: $120/hr or $550/5 (to schedule, 541-914-4812/ewartluf@gmail.com) **There are discounts on the private lesson price if you take the workshops!


Register for group classes: At the door or here.


New classes starting in Beaverton!

PDX SportsCenter

My new (second location, don't freak out Om Studio dancers!) will be upstairs at PDX SportsCenter, 8785 SW Beaverton-Hillsdale Highway. Go in the doors, around to the left, up the stairs, and turn left. You can't miss it! You can always check out what's going on at http://tangobeaverton.com/ although it does not yet come up on a Google search. Help me spread the word!

I will be starting beginning tango classes there this summer, as well as a second class TBD. There will eventually be a practica as well. Monday nights, 7-8:30 PM for right now, expanding to 7-9 PM (or something like that) will be my Beaverton schedule, at least to start. Thank you all of you West Side folks who have kept nagging me for years; I would not have gotten around to this without you!

My first class there will be....drumroll....

Tango, Toning and Technique

When I went to PDX Sports Center to look at the dance studio space, I noticed that there was a Pilates studio there--Lavinia Magliocco's new studio. I know Lavinia from the tango community, and several of my friends have studied with her. She recently had to relocate because of a fire in the building where her studio was located.

It seemed like kismet: we need to work together, Lavinia! We met and talked and played around with tango and Pilates, and the result is the first class at my new studio space. There are still 10 more spots open for the session. You can reserve your spot here.

TTT flyer 1 online.jpg

Lavinia's story

I’ve been a ballet dancer all my life and trained in professional schools NYC and NC. Diagnosed with Crohn’s Disease when I was 18, I was told I could never dance professionally. My other love is writing, so I got my BA in English and Comparative Lit and Communications, became a dance writer, and helped translate 19th century dance manuals for one of the country’s top Social Dance historians while performing in his troupe, The Flying Cloud Vintage Dance Troupe.
After life-saving surgery, I dove into studying Anatomy/Physiology, and Kinesiology and was introduced to the work of Joe Pilates. I credit Pilates with saving my career and body, and putting me back onstage in New York City at an age when many dancers choose to retire.
I bring 25 years of experience working with many kinds of chronic or acute injuries, and neurological conditions like Cerebral Palsy, CMT, & Guillaume Barre. My students have gone on to dance and perform professionally at high levels in their chosen arts, figure skating, ballet, ballroom, and acro.
It is my personal experience that injuries expose our weaknesses. We can let these setbacks end our careers or curtail our lives, or we can seize the opportunity to come back stronger than before. I’ve worked with clients as young as 8 years old, and currently, my oldest client is 95 years old.
Equipoise means the balance of opposing forces that allows us to move with grace. When we’re out of balance, we have no equipoise.
Enlightened means intelligent and aware. I specialize in empowering clients with knowledge of their bodies and techniques to support their lives, whether they’re performance athletes or dedicated grandfathers.
Sometimes I joke that I’m here to de-condition people - de-condition them from unhelpful and stagnant movement patterns that inhibit freedom. My private sessions with clients are one-to-one and are uniquely tailored to each person, since no two people are the same.
You can schedule an appointment by emailing me at epoiselavinia@comcast.net or calling me at 503.887.3608.

Tips for good pivoting in Argentine Tango

Improving your pivots in tango makes a lot of moves easier. Ochos, turns, boleos, . . . the list goes on and on. Pivots are just as important for leading tango, but I have been focusing on making videos for followers to improve their own dance. It seems to me that many classes only focus on how to lead tango, leaving the followers to do the best they can with little information.

Build your body map

If you spend some time working just on the pivots, your moves will improve. Finding what muscles work in your body to make a good pivot, helps you build your own "body map" of how the body works. Then, if something is not working, YOU can detect and fix the problems. Having a good teacher is very important, but that person cannot follow your around the dance floor, pointing out when you have successfully done a move, or when you have made a mistake.

Take the time to work SLOWLY on your pivots. Feel how they work in your body. Focus on your feet, or your hips, or your abs, or whatever part you are working on. Once you have a good feel for that part, add it into your body map until you can see/feel how all the parts work together. For me, when it is working, I feel as if there is a fiber optic cable running through the focus points, lit up like a Christmas tree. When something is not working, one of those connect-the-dot spots fails to light up.

After many years of working on my body map, I can tune into it pretty easily, but it took a lot of work to get to this spot. Don't give up!

Video time!

Turn technique for followers: practice drills

Here is a short video on turn drills to help improve your tango turns. My FUNdamentals class asked me to video some of the exercises that I do, so that they can remember them outside of class :-) Sorry about the sound: I was fighting a cold and sounded horrible the day I shot the footage for the drills, so I gave up talking and just typed the information on the video.

It is much harder to practice by yourself than with a partner. First, it's easier to practice when someone else says, "OK, put on your shoes now and let's go!" Also, when you have a partner, you can hold onto them, and that makes getting around the corners easier than on your own. Lastly, I tend to practice longer when I have someone to talk to; it's hard to make yourself do more than a few songs.

Making the video made me do a lot more practice that day! I kept shooting video, looking at it, and then going back to do it again. I think I did turn drills for almost an hour before I got interrupted by my family! So maybe we should all just turn on the camera and go for it! It never looks good, by the way. I can see every one of the mistakes I made here. I hope that, by leaving them in, you can see that it's not about perfect, it's about practice.

Leading different size steps for a saucy tango

Now that all the followers have learned to take uniformly sized steps, we are starting to learn to vary the size of steps during the dance. WHAT?!? What was the point of learning to keep them the same?

  • Safety: As the leader learns to lead, there are already so many variables that having a constant step size from the follower helps make tango danceable;
  • Control: You can't learn to vary your step size on purpose until you have learned to FEEL where your body normally exists in space (kinesthetic awareness).

Now that you have learned control over your steps, we can play with the dance to add flavor (what my teachers Oscar and Georgina call "picante") to your movement, based on musical promptings, other people's use of space, of just for fun.

Two of the combinations we have worked on in the Monday advanced class have dealt with leading the follower to use small steps interspersed with larger steps. In both, we changed the follower's "back-side-forward" steps of a giro into something a bit different.

The marca is the key to changing the follower's step size

One of my advanced students told my teachers that he didn't like using his hand as a part of the lead. He said he had been trained to NOT use his right hand and embrace to control movement. Oscar told him that he could continue to dance like that and "do your four or five moves" but in order to develop clear leads for more moves, he needed to learn to use the marca.

This is to head off all the comments from those of you who say to me, "But [x teacher] told me not to use my hands!" I believe that that person probably just didn't understand 100% how to make this dance easier and more elegant. Yes, it IS more work to learn to lead this way, but it means that your follower will go where you want, and do what you want them to do. I personally like to see that glazed, happy look on my follower's face after a tanda; don't you?

The point of the marca is not to signal the follower, but rather to be able to control the follower's movement gently and effectively. The follower does not need to "know" a signal because the follower's body is adjusted by the marca to make the move work.

The marca needed for step size is the suspension of the follower WHILE MOVING. When I suspend the follower:

  • If she is stationary, she will (hopefully) stay put on one leg;
  • If she is moving when you suspend, the follower's feet stay under her more, making her steps smaller: this is what we need!


Medialuna to the left (1st part of the combination)

Rather than getting three medium-sized steps for the medialuna, this combination asked the follower to step "big-big-tiny" in order to end in the cross: #4 is the key part:

  1. salida
  2. regresa (side step back towards original position)
  3. 1 step LOD (leader left foot, follower right foot)
  4. medialuna to the left, with the leader stepping forward diagonal on the first step with the right AND STAYING ON THAT FOOT, and then pivoting in place with the chest to twist the follower into the cross, rather than taking a forward step on the third step of the turn.
  5. Use the marca to pivot the follower into the cross with a light suspension. This limitls the size of step the follower can take.
  6. Collect and (if needed) pivot counterclockwise, then both move laterally facing left diagonal LOD, and collect again to pivot clockwise and step laterally, facing right diagonal.
  7. End ready to move LOD.

 A note: I teach followers to do uniform giro steps UNLESS led to do #4. Other teachers in the community teach to automatically do the cross, but then the leader has only one option for movement. This way, the leader has a choice of possible movements, one of which is to truncate the forward step into the cross.

Main object of doing this medialuna into the cross: use your new skills in step size to adjust spatially to position your next move on the crowded dance floor.


New Monday night sessions start 2/27


Both the Body Dynamics class and the Advanced class start new sessions the Monday after Valentango. There is NO CLASS 2/20: we are all too tired to learn after a festival :-)

7 PM: Body Dynamics

This class focuses on learning stellar technique to add more ENERGY and feeling into your dance. My style is body-based, working towards efficient use of the core to reduce wear and tear on the rest of the body. In each session, we look at how the body is built to move, and then work on using it the right way in tango.

This session, we will be preparing the body to move off-axis for colgadas, volcadas, etc. We will focus on using the core, the stretch of the body and leg strength (protecting the back), and also on freeing up a leg to combine boleos, etc., with these moves.

Also, we will work on being able to dance beautifully in small spaces.  Dancing small is hard to do with power and energy, but it is possible!

Designed for intermediate and advanced dancers, or beginners with dance background.

8 PM: Advanced class

Come challenge yourself!  Make your dance flow better; add sensuousness, balance, connection, musicality, adornos--take it to the next level! 

This session, the advanced class will focus on appropriate-for-the-social-dance-floor colgadas, volcadas, single axis turns, and playing with the axis. Each week, we will do a new combination, concentrating on dynamics, musicality and connection.

For dancers with at least three years tango experience, or instructor's permission. No partner necessary. You may work with a partner you bring to class, or trade partners.

$60/6 week session for one class. Special: sign up for both for $90! Drop in is $12/class.

Video of last week's advanced class

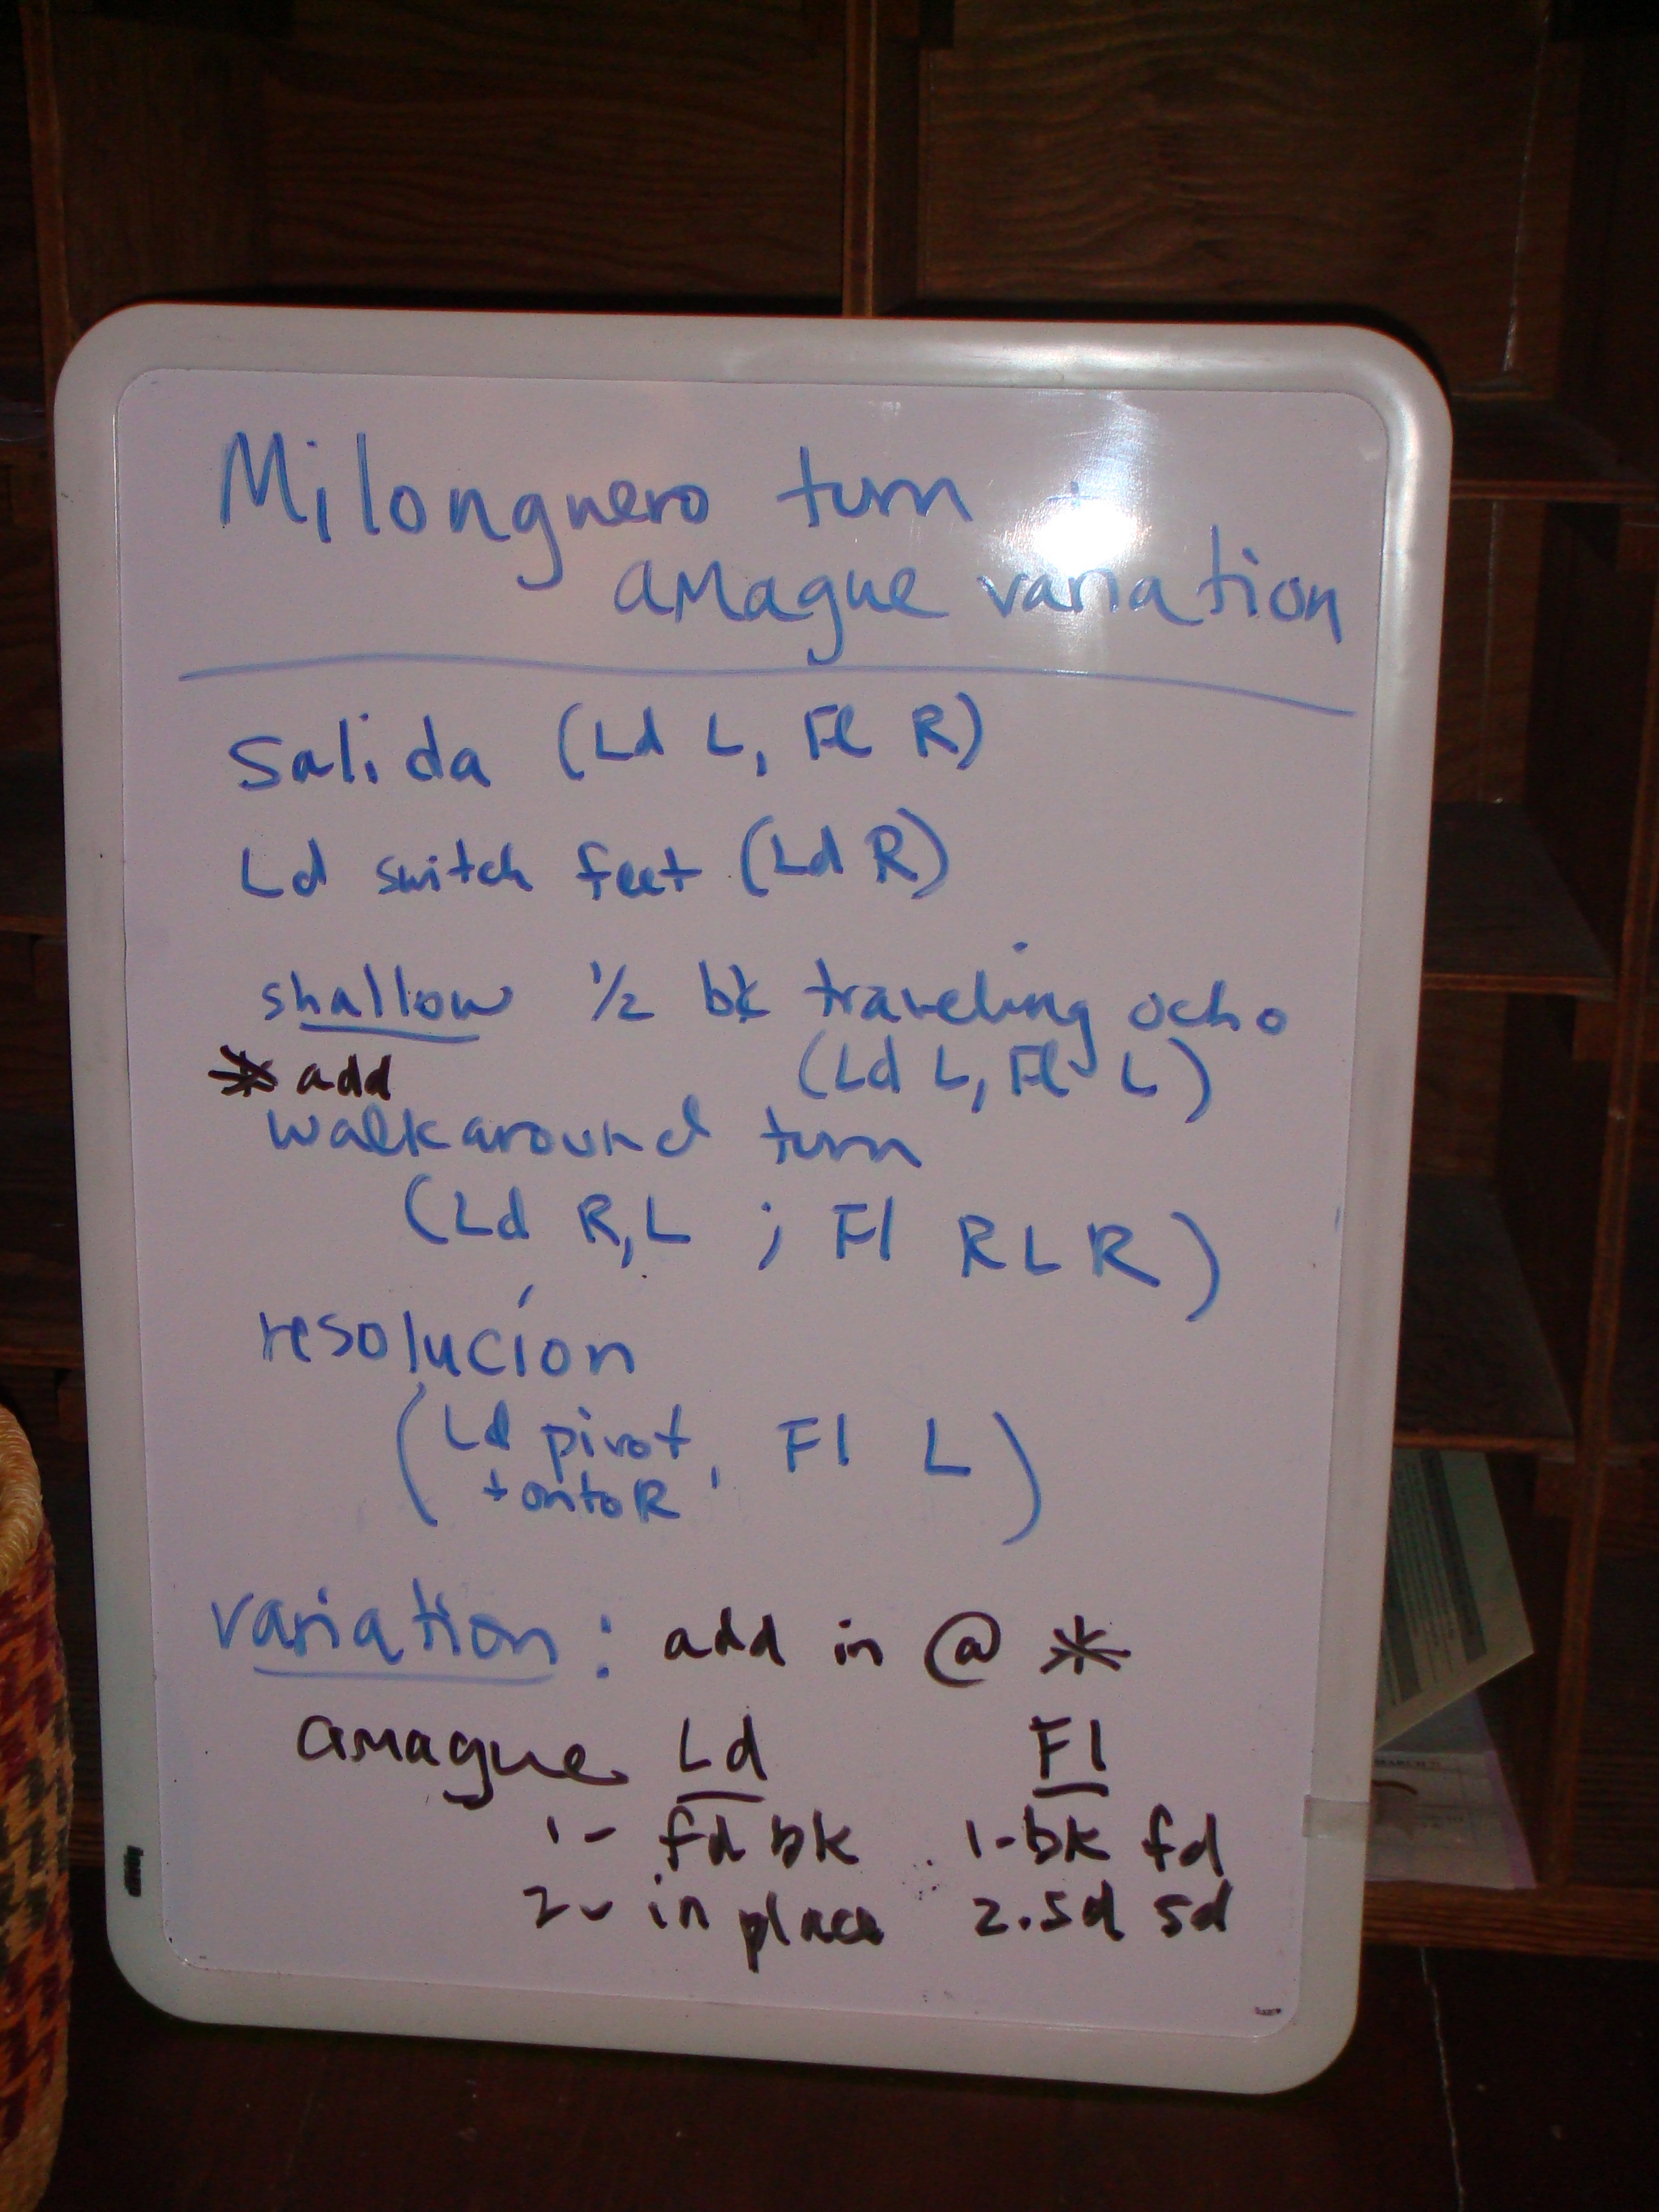
OK, here it goes! This is Oscar and Georgina's "Milonguero turn with amague variation" that they taught me and that is also on their DVD set.

Follower technique for the amague variation:

Download MOV02768


Leader technique for the turn, and then for the amague variation:

Download MOV02769


And here is the noteboard for the combination:

Milonguero turn with amague 1

Thanks for being patient, everybody!  If the movies don't work, let me know (it let me play them).  I'll gussy up the process once I get used to doing this :-)   Thanks Rich for the camera work!

Buenos Aires basics (Popular tango moves 3)

This is the third (of three) reviews for the moves we worked on in my intermediate tango class these last six weeks. As I have said before, we learned moves that were led on me hundreds or thousands of times on my most recent Buenos Aires trip. All of them are moves that are simple in concept, work in small spaces, can be done in closed or open embrace, and and are fun to do; but that have subtle tricks to make them work better.

Left turn with rebound step

Although I commonly think of this as two separate patterns, they were often combined in Buenos Aires to make a nice, compact turn with a quick, quick, slow; quick, quick, slow pattern in the music. 

Leaders:

  • Lead a rebound, forward on left, back on right for yourself; back on right, forward on left.
  • The traditional timing is quick, quick BUT make sure you are using the rebound! Don't truncate it to be on time. Remember, to adjust the follower's step size works much better. The magic "la marca" allows you to reduce the size of the follower's step by keeping her/his foot more under the body.
  • Lead a left turn. Make sure you rotate in place and keep the the spiral in your torso so that the follower keeps doing a grapevine.
  • The traditional timing on the turn is slow, quick, quick, slow.

A lot of leaders in Buenos Aires did two rounds of this before exiting, even though we usually  made it all the way around in one set. Of course, traffic didn't move very much on the dance floor. Here in Portland, with leaders zooming down the room, you might want to only do one set so as not to get run over!

Followers:

  • Do a back on right, front on left rebound. Make sure you complete this movement before beginning the turn around the leader (don't make a triangular movement; return to original spot!).
  • In your turn, make sure that each step is completed by finishing the push off with your toes the way we've practiced. This allows you to arrive on balance so that you can slow down or speed up as the leader asks.
  • For your back cross step, use those hips! This is a swivel and then push off move--don't swing your feet for momentum.
  • Traditional move: four step turn, side step with right, back cross with left, side step with right, front cross with left.
  • Traditional timing: slow, quick, quick, slow. When you add it to the rebound, the entire pattern is: quick, quick, slow; quick, quick, slow.
  • In Buenos Aires, I was expected to deliver this timing. If I waited to be told the timing, dancers felt I was going too slowly. Here, where many leaders lead all-slow versions of turns, it may take some adjusting of this traditional timing.

Adorno for right and left turns for followers

  • Between the back cross and the next open step in a turn (right or left), allow your knees to rebound against each other as your legs pass under you. If you are doing a right turn (clockwise), the free leg doing the adorno is the left; to the left, it is the right leg.
  • This LOOKS like you are doing an ankle adornment, with the free foot sliding in front of the support leg, and then going into the side step, but if you concentrate on the ankles, you may trip yourself (ask me how I know this!).
  • This adorno has the added bonus that it helps you arrive on axis better during your back cross steps in the turn.
  • Remember to keep your hips back while you do the adorno. If you lock your knees while your dance, or bring your hips forwards, you will not be able to make this move look as good, and may trip the leader (luckily, I do not know this from my own experience!).

Walking circles clockwise

Of course, you can do these the other direction as well. And in crossed system. However, the clockwise, parallel version was the one that guys in Buenos Aires tended to lead.

For those of you also in my milonga class that I co-teach with Robert Hauk, this should look familiar: we did it in the winter session of the milonga class! Here in Portland, Robert, as well as Steven Payne,  lead very sweet circles like this, but no one else really seems to. In Buenos Aires, I had this led on me more frequently.

There's only walk technique involved here. Doing the porteno walk (see the Tango Fundamentals review sheet in the right column, top page under PAGES), simply walk in a big enough circle that the follower walks backwards instead of pivoting in place on the dance floor.

Simple way to get going: Take a side step as if doing a salida, and then walk forward. This gets you into the nice, connected twist that will keep the follower from stepping in front of you. Keep herding the follower towards the center of the circle; go all the way around; continue line of dance.

Buenos Aires basics (Popular tango moves 2)

Ocho cortado turn

Because ocho cortado has two distinguishable parts (rebound bk/fd and step; rebound sd/sd and step), it  lends itself to endless variations of the type that I call fillings: imagine the ocho cortado as really yummy bread with various things in the middle. A favorite is inserting a right turn into the ocho cortado:

  1. Execute the first rebound (bk/fd for follower, fd/bk for leader) and the step (fd for follower, bk for leader), so that the follower steps to the leader's right/inside track.
  2. Turn is follower's open, back, open, front steps. The traditional timing, which I advocate, is slow, quick, quick, slow.
  3. End with terminal rebound and close of ocho cortado (sd/sd rebound, with circular component): follower rebounds left/right and closes in front with left, like going to the cross; leader rebounds right/left with a VERY SMALL step, focusing more on making the rebound circular for the follower in order to aid in closing into the cross. If you want to exit in parallel, the leader shifts weight onto the right while leading the cross.

Ocho cortado with sacada

The step above can have a leader's sacada (displacement/replacement) through the first open, or side step, of the turn in step #2 above. This makes the turn have a more dynamic feeling. It may be sacrilege to suggest this, but I think that a lot of milongueros with whom I danced this move in Buenos Aires, did this move by accident! Some of the older dancers did not have very much flexibility, and instead of twisting to the right to initiate my turn, they stepped through my first step to build momentum :-)

  • The leader can do this with either foot, but it is easier to use right foot because it's already free.
  • Remember that you are leading a turn, and your torso needs to continue to tell the follower to travel around the perimeter of the circle; do NOT abandon the follower to move yourself.
  • The leader's step needs to go towards where the follower had been: towards the follower's right foot placement of the open step. 
  • Once you land in the new location, remember to remain upright! If your axis tilts, this makes the turn very hard for the follower to complete elegantly.
  • Followers: this version of the turn is a bit harder than a completely stationary turn because the center of the turn moves while you turn around it. Keep your own axis upright, and everything will go better.
  • End with the standard second half of the ocho cortado.
  • If sacadas are new to you, look at my posts about sacadas.

My favorite variation to end ocho cortado turns

If you are bored with the turn above, try removing the second half of the ocho cortado (rebound sd/sd and step) from the pattern, and exit the turn a different way. This is the step we've been working on perfecting in the Portland intermediate class recently. This truncates the follower's turn to the first two steps, open and back, and exits linearly

Exit on follower's back cross step

  1. As the follower lands on the back cross step of the turn, LIGHTLY (remember la marca?) lift so that the follower stays on that foot (her/his right).
  2. Allow the follower's hips to unwind. Followers: this is a fun place to play with an adorno!
  3. Release the lift.
  4. Exit.  I prefer walking to the cross in crossed system because as a follower, twisting back the other way is not very comfortable.

Trouble-shooting this move

As I watched the class learn this move, I realized that many people try to follow the steps exactly, even if the weight distribution and balance are not working. It is much more important to be on balance here than to remain perfectly in place. May I suggest:

  • Followers: Make sure your turn has strong, balanced hip movement. If you swing your leg to make turns, don't! Your hips are the motor of the turn, allowing you to keep a tight, elegant, on-balance giro around the leader. This will  keep you the same distance away from the leader, helping both of you balance.
  • Leaders: If you don't twist easily or you tend to fall over when you twist your torso, consider taking an extra step--or two, or three! When the follower lands on the back step and you lift lightly, move over in front of them (a baby calesita), rotating around the fixed point of the follower's axis, until both people are on balance and facing down the line of dance to exit.

Good luck and have fun!

Basic tango pointers: notes from my Tango Fundamentals class

This session of Tango Fundamentals, we've been working on building balance, connection and energy with our partners.  We've also worked on starting and exiting turns in different ways, as well as spiffing up our traveling back ochos. Here's what we've covered in the first three weeks of class:

Balance, connection and energy

  1. Energy flow drill: This drill teaches you to be aware of the energy and motion of everyone dancing in the room. As a good leader, you must know this in order to successfully and safely lead the follower around the dance floor. As a follower, being aware of this helps you be a responsible dancer (i.e. limiting your boleo height, restraining big adornos in a crowd, etc.). In the energy flow drill, we all move through the available space (in any direction), and try to remain constantly in motion. If someone is in the way, we turn, rather than pausing. If there is space somewhere else in the room, we go where there is space. In "real life" tango situations, there are cultural rules that prevent us from having this much freedom: we dance counter-clockwise in the room; we don't pass the couple in front of us; we maintain "lanes" of movement. However, by remaining aware of the space around us, and how the entire room of people is moving, we can plan ahead better and avoid accidents.
  2. Solo-couple drill: This game teaches you to get connected to your partner quickly. Once the energy flow of the room is working, we move through the space in couples. In Solo-Couple, the teacher calls "Solo!" and everyone does the energy flow drill. When the teacher calls "Couple!" everyone grabs the nearest dancer, and WITHOUT STOPPING, continues to dance around the room. Again, in "real life" tango, there is time to cabeceo, approach the dance floor, take your space, embrace your partner, and then start dancing. However, in festival situations, there is no space to spend time on all of this, and you need to get on the floor, connect, and start dancing within about 30 seconds if you don't want to be run over! This drill gets the dancers to tune in to their surroundings in order to successfully survive joining a tanda in full swing.
  3. Energy bunnies and energy vampires: This game helps you maintain your energy on the dance floor throughout the evening. I don't remember which of my students at the University of Oregon named this game/drill, but I've kept the names because everyone laughs when we do this! Obviously, this is an energy game: take energy from the people around you if you are tired, or give energy to the room/your partner if you are energized. On each dance floor, there is a level of energy present. Sometimes, the room's energy gives the dancers energy; sometimes not. In this game, we move through space in any direction, and make sound effects/motions to send energy to everyone we pass. Then, we move around, taking energy away (little sucking noises and vampire faces seem to be the favorites). I have found that everyone in the room has a higher energy level after this game, and use it in class to wake folks up; on the dance floor, I use this energy-building skill to be able to keep dancing, hour after hour (I don't make the noises and faces then!).
  4. Naughty Toddler: This game helps the follower give energy to the leader, and teaches the leader to use the energy as a way to improvise on the dance floor. Just as it is easier to divert a toddler than to stop unwanted behavior, it is easier to redirect a follower than to wrestle with them. The follower does not follow in this game: s/he does whatever moves come to mind, tango or non-tango. The leader holds on with both hands, and tries to use the follower's energy to get around the dance floor without collisions. As the leader figures out how to steer the "toddler" this game becomes "my chi is bigger than your chi" as the leader reads the energy and PREVENTS the "toddler" from misbehaving by leading clearly with the energy present in the dance: by the end of the game, the leader should feel mostly in control AND the follower should have felt led, but not wrestled.
  5. Posture work: floor, sitting, standing. We start lying on the floor, feet flat on floor and knees up (in skirts, face a non-mirrored wall). Feel how relaxed your spine and hips are! Feel how your spinal alignment works when not fighting gravity. Now, sit up (cross-legged on floor, or in a chair if you lack flexibility). Try to recreate the same alignment as on the ground. Third, stand up and again recreate the floor alignment, adding the complexity of adjusting your pelvis for standing. The more you do these three steps, the more your alignment will remain relaxed AND in position when you move in tango.
  6. Breath work: axis and force field. I do the axis drill after completing the postural work. Standing in place, alone, on axis, close your eyes. Breathe and imagine the air can come up from below the floor, up through your body, to your lungs. When you exhale, send the breath back down through your feet, as if you are pushing a magnet away beneath the floor. After a few breaths, change the exhale to go up through the top of your head and up to the ceiling. Third, exhale and inhale with the same amount of energy and breath coming in from the feet and head; and exhaling 50-50 as well. In the force field drill, face partner close enough to be in their personal space, but not touching. Do the axis drill, but when you exhale, also send energy/light/electricty/your favorite color/etc. straight out your toes, through your partner, and to the wall beyond them. After a few breaths, expand that to a rectangle of energy from the toes and knees; expand to the hips; add up to the belly button; now up to the ribcage; next, include the shoulder blades and collar bones; finally, the entire body sends a rectangular force field through the partner, to the wall beyond. When this is in place, move in to an embrace and dance with your partner, eyes closed. On each exhale, move. On each inhale, pause. Keep the force field working.
  7. Energy work: directing movement from the solar plexus. We moved across the floor, met a partner, and kept sending our energy across the room, slightly up and through the partner (there were interesting interpretations of this, but we'll leave that for later ;-)). In order for you to NEVER step on your partner's feet, you need to send your energy forward into their body. The solar plexus should never point down, or your partner's feet will suddenly be in your way. Followers: remember to send the energy TOWARDS the leader, rather than "escaping" away; it will save your toes!

Steps

Turns: Last session, we concentrated on turning after reaching the cross (la cruzada).  This time, we expanded our ways of getting into a turn.

  • right (clockwise, CW) after side step (follower's first step of the turn is a front or back cross step with the right foot)
  • left (counter-clockwise, CCW) after side step (follower's first step of the turn is a front or back cross step with the left foot)
  • right (CW) after rock step (follower's first step of the turn is a front cross step with the right, across the leader's body)
  • left (CCW) after rock step (follower's first step is a front cross step with the left, across the leader's body)
  • rock step and left (CCW) turn (follower's first step is an open step around the leader with the right foot)--this is NOT the same as starting the turn FROM the rock step. Here, the leader leads a rock step so that the follower's RIGHT foot is free; thus the turn starts with an open step for the follower.
  • at the cross (@X), right (CW) or left (CCW) turn (follower's first step is either a front cross or an open step, with the right foot.

Traveling back ochos: There are many ways to do this step.  I advocate a smooth, elegant, sexy version that allows the follower to pivot slightly and adjust in the hips, while the leader basically walks forward.

  • Get into crossed system: I prefer stepping forward-together-forward, rather than side-together-forward here. I feel that the follower gets a clearer signal if the first step is line-of-dance (LOD), rather than sideways.
  • Leader walks in a SLIGHTLY wider stance, but keeping the V of the feet facing LOD and the hips facing LOD. This is not a time to start waddling ;-)
  • The leader's chest moves in a natural, cross-body motion in order to walk. No more motion is needed here. If you tend to be rigid in your torso, you may have to work on this rotation around your spine in order to make your walk more elegant and easier on your body.
  • The follower's body also uses cross-body motion in order to walk backwards. Because you are now in crossed system, the follower's free leg NATURALLY crosses behind the other leg. The hips adjust and pivots slightly, as do the feet, to make this look pretty and to remove stress on the spine. Take care not to overturn in this move (in open embrace, a bit more rotation can be used for a more zig-zag style of ocho, but I personally prefer this one.
  • To exit, walk to the cross in crossed system, resolving at the cross. Alternatively, you can exit by turning CW or CCW into a turn. I don't usually lead back into parallel walks to exit because it isn't very elegant. Also, when do you ever have space to walk traveling back ochos and then keep walking? :-)

This week, we'll be adding walking to the outside track, in parallel and crossed systems, and playing with the "forgotten" side of tango.  See you in class!

Combining leader and follower front sacadas with other tango moves

Sunday Special participants: good work yesterday! Below, I'll outline the drills we did to prepare for sacadas, sacada technique for leader and follower front sacadas, and the combinations we played with in class, as well as some other ideas to work on yourselves. Remember, next Sunday Special will include a review class on this material, so if you have any questions, comment here and I'll get back to you, as well as making a list of what to cover

Types of sacadas

  • circular or linear (we worked on circular and linear forms in our combinations, but we emphasized circular this time)
  • leader or follower (who is replacing the other person?)
  • forward, side or back (what kind of step is the person doing who is doing the sacada?)

Preparing for sacadas

The most important element of a good sacada is a good turn. Even if you are doing linear sacadas, the technique inherent in turns and ochos is needed by BOTH partners to do spectacular sacadas: pivoting well against the floor, having your axis perpendicular to the floor, grounding in each step, and using the floor to push off for each step. For that reason, I always have leaders and followers do "follower" turn technique to warm up the body for sacadas.

Follower technique (for good turns and sacadas):

  1. Grapevine step (molinete) across the floor in a straight line: get your balance, breath & grounding in place
  2. Grapevine step in a circle: add your focus on keeping the energy of the body towards the center of the circle
  3. Square/Chair drill: "the dreaded chair drill" came to me from Luciana Valle. The chair drill alters a turn into a square, so that four steps completes a full revolution. The torso faces towards the center of the chair at all times. The hips flip 180 degrees before the back cross step, as well as before the "slow" open step of the turn. The front cross and the "quick" open step of the turn do not result in much hip motion at all (think zero for the purpose of this exercise). Remember to change directions so as to practice to the right and left, and to avoid dizziness.
  4. "Watch your hand" drill: This was taught to me by Oscar Mandagaran in Buenos Aires in 2000, and I have used it more and more in my dance and my teaching. To turn CCW (to the leader's left), make a normal embrace. The follower watches her/his hand, and "drives" the turn. This helps focus on having an embrace that is parallel to the ground in energy (even if the dancers are not the same height and the embrace does not physically follow a parallel path!). Also, the follower is responsible for helping to create energy and give that to the leader for the dance: make sure no muscles are locked in the embrace that will hurt the turn.
  5. Naughty Toddler: in this version of Naughty Toddler, the follower is still in control of the dance and the leader is still trying to carve a tango out of all that wild, untamed energy the follower lets out. However, what we focused on was having Naughty Toddlers who wanted to TURN! so that the followers could still practice turn technique, while searching for just the right amount of energy to give to the leader. Leaders: see how much easier it is to turn when the other person does most of the work? :-)

Leader technique to prepare for sacadas:

Do all the follower exercises. #1, 2 & 3 are especially important. A good sacada lead includes preparing to step through and then (often) pivoting to continue to another step, just as the follower does in all turns.

Spiral exercises/Disassociation exercises:

  • I just discussed these in the lapiz blog entry below, so I'll be quick here. Find your axis through your foot into the floor, and up through your head to the ceiling. Rotate your solar plexus, keeping your hips stable in space (solar plexus and hips are pointing different directions; disassociated). When you have reached your maximum twist, release the hips to realign under the torso.
  • Part #2: As the hips release, continue to spiral them while keeping your torso stable. When your hips get ahead of your torso, release your torso to realign with your hips. This level of control helps your body learn to move only one part at a time, while not breaking your axis line. Also, it will aid in all sorts of fancy stuff later on.

Sacada practice:

  • Make a path: One partner walks slowly around the room. The other partner steps exactly where the first person stepped. Notice that, if you step exactly where they were, you remain the same distance apart. Although in some combinations, the sacada is used to get closer or further from the partner, in most sacadas, you are trying to remain the same distance apart.
  • Slo-mo: Without touching, the leader's torso leads the follower to a new place on the floor. For leader sacadas, the leader then steps where the follower was. For follower sacadas, the leader is moving the follower to the place where the leader had been. Slo-mo makes sure that the leader is completing the lead, rather than indicating a location in space and abandoning the follower to finish on their own. If you can lead sacadas without arms, in slo-mo, you can do it with NO problems in an embrace, up to speed :-)

Leader front sacadas:

  • Practice doing leader sacadas through the follower's turn. You can step through the follower's front or open steps. If you step through their back cross step, this creates a different result (boleo-like with unwind) that we will tackle another time. High school math version of tango: don't step through the follower's back step for the moment!
  • For leader sacadas, the leader can step through with either foot, to either side. Sometimes, this results in the leader doing a "front cross" step (for example, doing a clockwise, circular lead sacada through the follower's front cross step with the leader's right foot; whew!). Other times, it feels like a straight-ahead step: you are actually doing the sacada with an open/side step. Let's not worry at this point whether this is a front or side: just get comfortable with using either foot, and we'll get technical about terms next time. Also, the leader can use back cross steps to perform a sacada, but we'll do that next time.

Follower front sacadas:

  • Practice doing follower sacadas through the leader's open step. The leader stands in a wide stance, with the follower centered in front (making a triangle). The follower holds onto the leader's torso, at the level of the solar plexus, and closes his/her eyes to focus on following. Using torso rotation, the leader moves the follower towards one of the leader's feet, and gets out of the way. Rachel advocated leaning to one side as well.
  • Be careful not to change your level! The knees are flexible, but you don't want to bob up and down. Once you can get the follower to step into your space to replace you (do a sacada through the leader), try it in an embrace.
  • It is HARD to convince a follower who is new to sacadas, to walk into the space where you were. Make sure you don't overturn the follower, or they will happily do an ocho around your center instead of stepping where you asked. Be clear, and the follower will eventually become comfortable with stepping into a sacada. Try not to pull!

Sacada combinations

We only had time for a few combinations this time. Remember: play around! Try new stuff! You may find a combination that you really like. Use it! Here's what we did in class on Sunday:

  • Leader front sacada + follower front sacada: Walk the follower to the cross. Start a right (clockwise) turn around the leader. Leader front sacada with left foot (actually a side sacada) through follower's front cross step (1st step of turn). Then, lead the follower to do a front sacada (actually a side sacada) through the leader's front cross step. Repeat a few times (each person alternates front cross step, sacada through other person's front cross step) and exit. If you want a specific exit: let the follower take a side step around the leader, collect feet and walk out in a regular tango walk.
  • Leader sacada + drag: Walk the follower to the cross. Sacada through the first step of the right turn. Turn the follower one step more of the turn (open step). Drag the follower's foot (follower's back step) around with either foot of leader (try both and see what you like). Lead a stepover and exit.
  • Leader front sacadas: Lead overturned front ochos down the room (these are linear sacadas, BTW). Sacada every step, using either foot: you can mix it up and step with the same foot each time, switching between steps; or just "walk" alternating feet. Find an exit you like and keep dancing.
  • Follower front sacada: Walk the follower to the cross. Lead a follower front sacada straight forward, with the leader moving clockwise in an open step with the left foot. If you want a circular sacada, move around the follower's position. If you want linear, move left BUT remember to finish the follower's step with your chest rotation!

Next time, we'll review these. Then, we'll learn follower and leader BACK sacadas, and combine those with front sacadas and other stuff. The next Sunday Special is slated for Sunday, April 26th.

Let me know if anything is not clear here, or if you'd like more detail.  Thanks for coming to class!

Spirals in the body for turn technique

Last week, we worked on leading right turns, left turns and front ochos after walking to the cross. For both the leader and the follower, these turns and ochos are relatively simple IF the spirals around the body's axis are used efficiently.

Leading turns

Leaders tend to muscle through turns and ochos in an effort to lead the follower "clearly". This often ends in the leader (and follower) being off-balance. Yes, your windup for the turn does INDICATE to the follower what you want, but it does not LEAD. To me, this is like turning on your turn signal at the "one-mile-to-the-exit" sign on the highway, but then not turning the steering wheel at the actual exit. The follower has to try to figure out when and how to execute the turn, rather than follow your lead.

So how do you lead efficiently? (I always prefer a clear but subtle lead to being driven like a Mac truck). Spirals! When I lead a turn, I ground my hips. That is, I try to keep them pointing the same direction as the V of my feet. I rotate my torso more freely, as I am more on balance this way. I focus on my solar plexus vs. my hips, making a SMALL spiral in my body, on axis. Only after I establish this spiral do I allow my feet and hips to also turn. I keep this spiral until I want to end the turn, at which point I catch up with my hips and V of my feet.

Trouble-shooting for your turns:

  • If your partner seems to pause at each step of the turn, or simply moves step together step instead of doing the grapevine step around you, you are probably NOT using a spiral. Make sure that you are continuing the spiral once you have established it. If that still doesn't work, focus on sending energy out your solar plexus and rotating that with a constant speed (at least for now) until you want the turn to end. BREATHE.
  • If you constantly get stuck about two steps into the turn, make sure you take your feet along with you sooner. A lot of folks use their extreme rotation to start a turn and then get stuck. I use most of my rotation, and start rotating in place before I feel torque on my knees or ankles. You will feel like you are making less of a spiral, but your follower will not: they are following the spiral of your torso.
  • If your partner seems to always be ahead of your position, perhaps you are pulling with your embrace. When I studied with Mingo Pugliese in Buenos Aires, he said, "Imagine your chest and your shoulders and your arms are all carved out of the same piece of wood." When you spiral, your elbows and hands don't "help" your partner in the turn. Your chest gives that information, which is relayed by the embrace.
  • If your partner seems to always be behind your position, perhaps you are clamping down too hard on your embrace. Focus on letting the energy and breath of the movement lead, aided by the body. I think that intention (although very woo-woo) is what really moves the follower; the physical lead only helps that.
  • If those suggestions don't fix the problem, see below for follower issues :-). To lead and follow a good turn takes a long time, so be patient with each other!

Following turns

First, I want to emphasize the importance of practicing your turns. The technique you learn here, spiraling your body from your solar plexus to the tips of your toes, applies to all those cool moves you beg me to teach you: boleos, ganchos, etc. Perfect your turns, and leaders will line up to dance with you!

Second, I want to remind you that turn practice is not something you will perfect and move beyond. At least, I haven't. I still work on my turn technique after thirteen years of tango, and it gets better every year. If you are a goal-oriented person, this may sound frustrating. You can set yourself mini-goals to achieve along the way (i.e., a fabulous back cross; a lovely adorno at the end of a turn; etc.).

Third, you can create a beautiful turn regardless of the level of your leader. Although it is not your job to make your leader's dance better, executing gorgeous turns, on balance, with energy, will make both partners' technique look better. Yes, a poor leader can make it harder to turn well, but that is no excuse! I don't "dumb down" my follower technique to follow a beginner or a poor lead: I try to make it the best I can to make the dance feel good for both of us.

OK, now that I've got that off my chest, on to the technique :-) The spiral for the follower differs from the lead spiral. The leader uses grounded feet and hips to stabilize so that the torso can be mobile and rotate. For the follower, the upper torso and solar plexus connect with the leader (whether physically or via breath and energy). That provides the stability to let the hips, legs and feet create the body spiral. I spiral around my own axis in a turn, not around my leader (if you are a tango leaner, there is an aspect of spiral around the leader's axis as well, but we'll leave that for the moment).

I use my body efficiently to get as much spiral as I can. A back cross in a turn is much more than a 180°pivot. When I turn, I use my maximum spiral to make a good, solid back cross in the turn. When my spiral is centered around my own axis, it is easier to create even more spiral. Because my feet are under me, I can then use the floor for stability and balance.

A turn has moments of winding into a spiral and unwinding to neutral for the follower. A front or back cross uses a degree of spiral, while open/side steps return the body to neutral for a moment. Use that constantly changing spiral to make your turns better. If you hold your breath, you cannot unwind as completely, thus taxing your muscles more than necessary. The spiral for turns (and ochos) is very dynamic, which allows you to constantly build your energy, recover balance (if necessary) and tune into the leader. Remember, the leader can choose different speeds for a turn (all slow steps, all quick steps, or the traditional slow slow quick quick), so working on your spiral allows you to respond more subtly to the leader.

When you feel the beginning of a spiral, you know this movement will require pivoting the hips, legs and feet. If you are led in a turn, it is your job to remember which step of the grapevine comes next. It is also your job to keep turning until the leader asks for something different. Hopefully, you will feel the leader's spiral return to neutral, which will return your spiral to neutral, ending a turn. Later on, other moves will come out of the turn, but for right now, you know it's going to be a walk (if you are in my Tango I in Salem :-) ).

Trouble-shooting for your turns:

  • If you seem to get further and further away from the leader, so that you cannot stay connected physically, examine your back cross step. This is the hardest step of the turn. If you tend to swing your leg around the back to create your spiral, you are probably tipping your axis over. Try to spiral all the way down to your feet, only sliding your foot behind for the cross step when your hips and legs/feet are completely in their spiral.
  • If you seem to be off-balance a lot in your turn, focus on your axis and support leg. A lot of dancers reach with their free leg BEFORE using their support leg to begin a step, worried about being behind on a step. If you push off from your support leg (which might feel as if you are waiting too long to project with the free leg), you will actually arrive at the new location faster! Pushing off FIRST allows your leg to project, but in sync with the leader's axis, so that you will arrive at the same time as the leader, with more energy, on balance. Think: push off support leg, project free leg, follow through with your support leg and toes to land (these three parts have to work in this order).
  • If you are having trouble keeping up with the leader's rate of spiral, the only answer is to push off and use ENERGY from the ground up. Think fewer steps and bigger, rather than running around with tiny steps. You are the motor of the turn: rev it up! (This is only possible once you are on balance, so focus on the step above first).
  • If you feel that you are always ahead of the leader, focus on the spiral of their torso, not on what their hands are leading. A lot of leaders give you two or three pieces of information, with the arms and torso moving at different rates. I always focus on what the solar plexus is doing and try to ignore extra information from the arms (like the scarecrow's "He went that-a way!" in The Wizard of Oz, you have to figure out which piece of information is the important one!).
  • Use ocho technique drills to help you with your front and back cross technique outside of turns, and then apply it to your turns. Like turns, ochos take a long time to perfect: your entire tango life. Again, if you apply yourself to your drills in practice, your dancing will improve on the dance floor.

Salem dancers: see you tomorrow!