Video of last week's advanced class

OK, here it goes! This is Oscar and Georgina's "Milonguero turn with amague variation" that they taught me and that is also on their DVD set.

Follower technique for the amague variation:

Download MOV02768


Leader technique for the turn, and then for the amague variation:

Download MOV02769


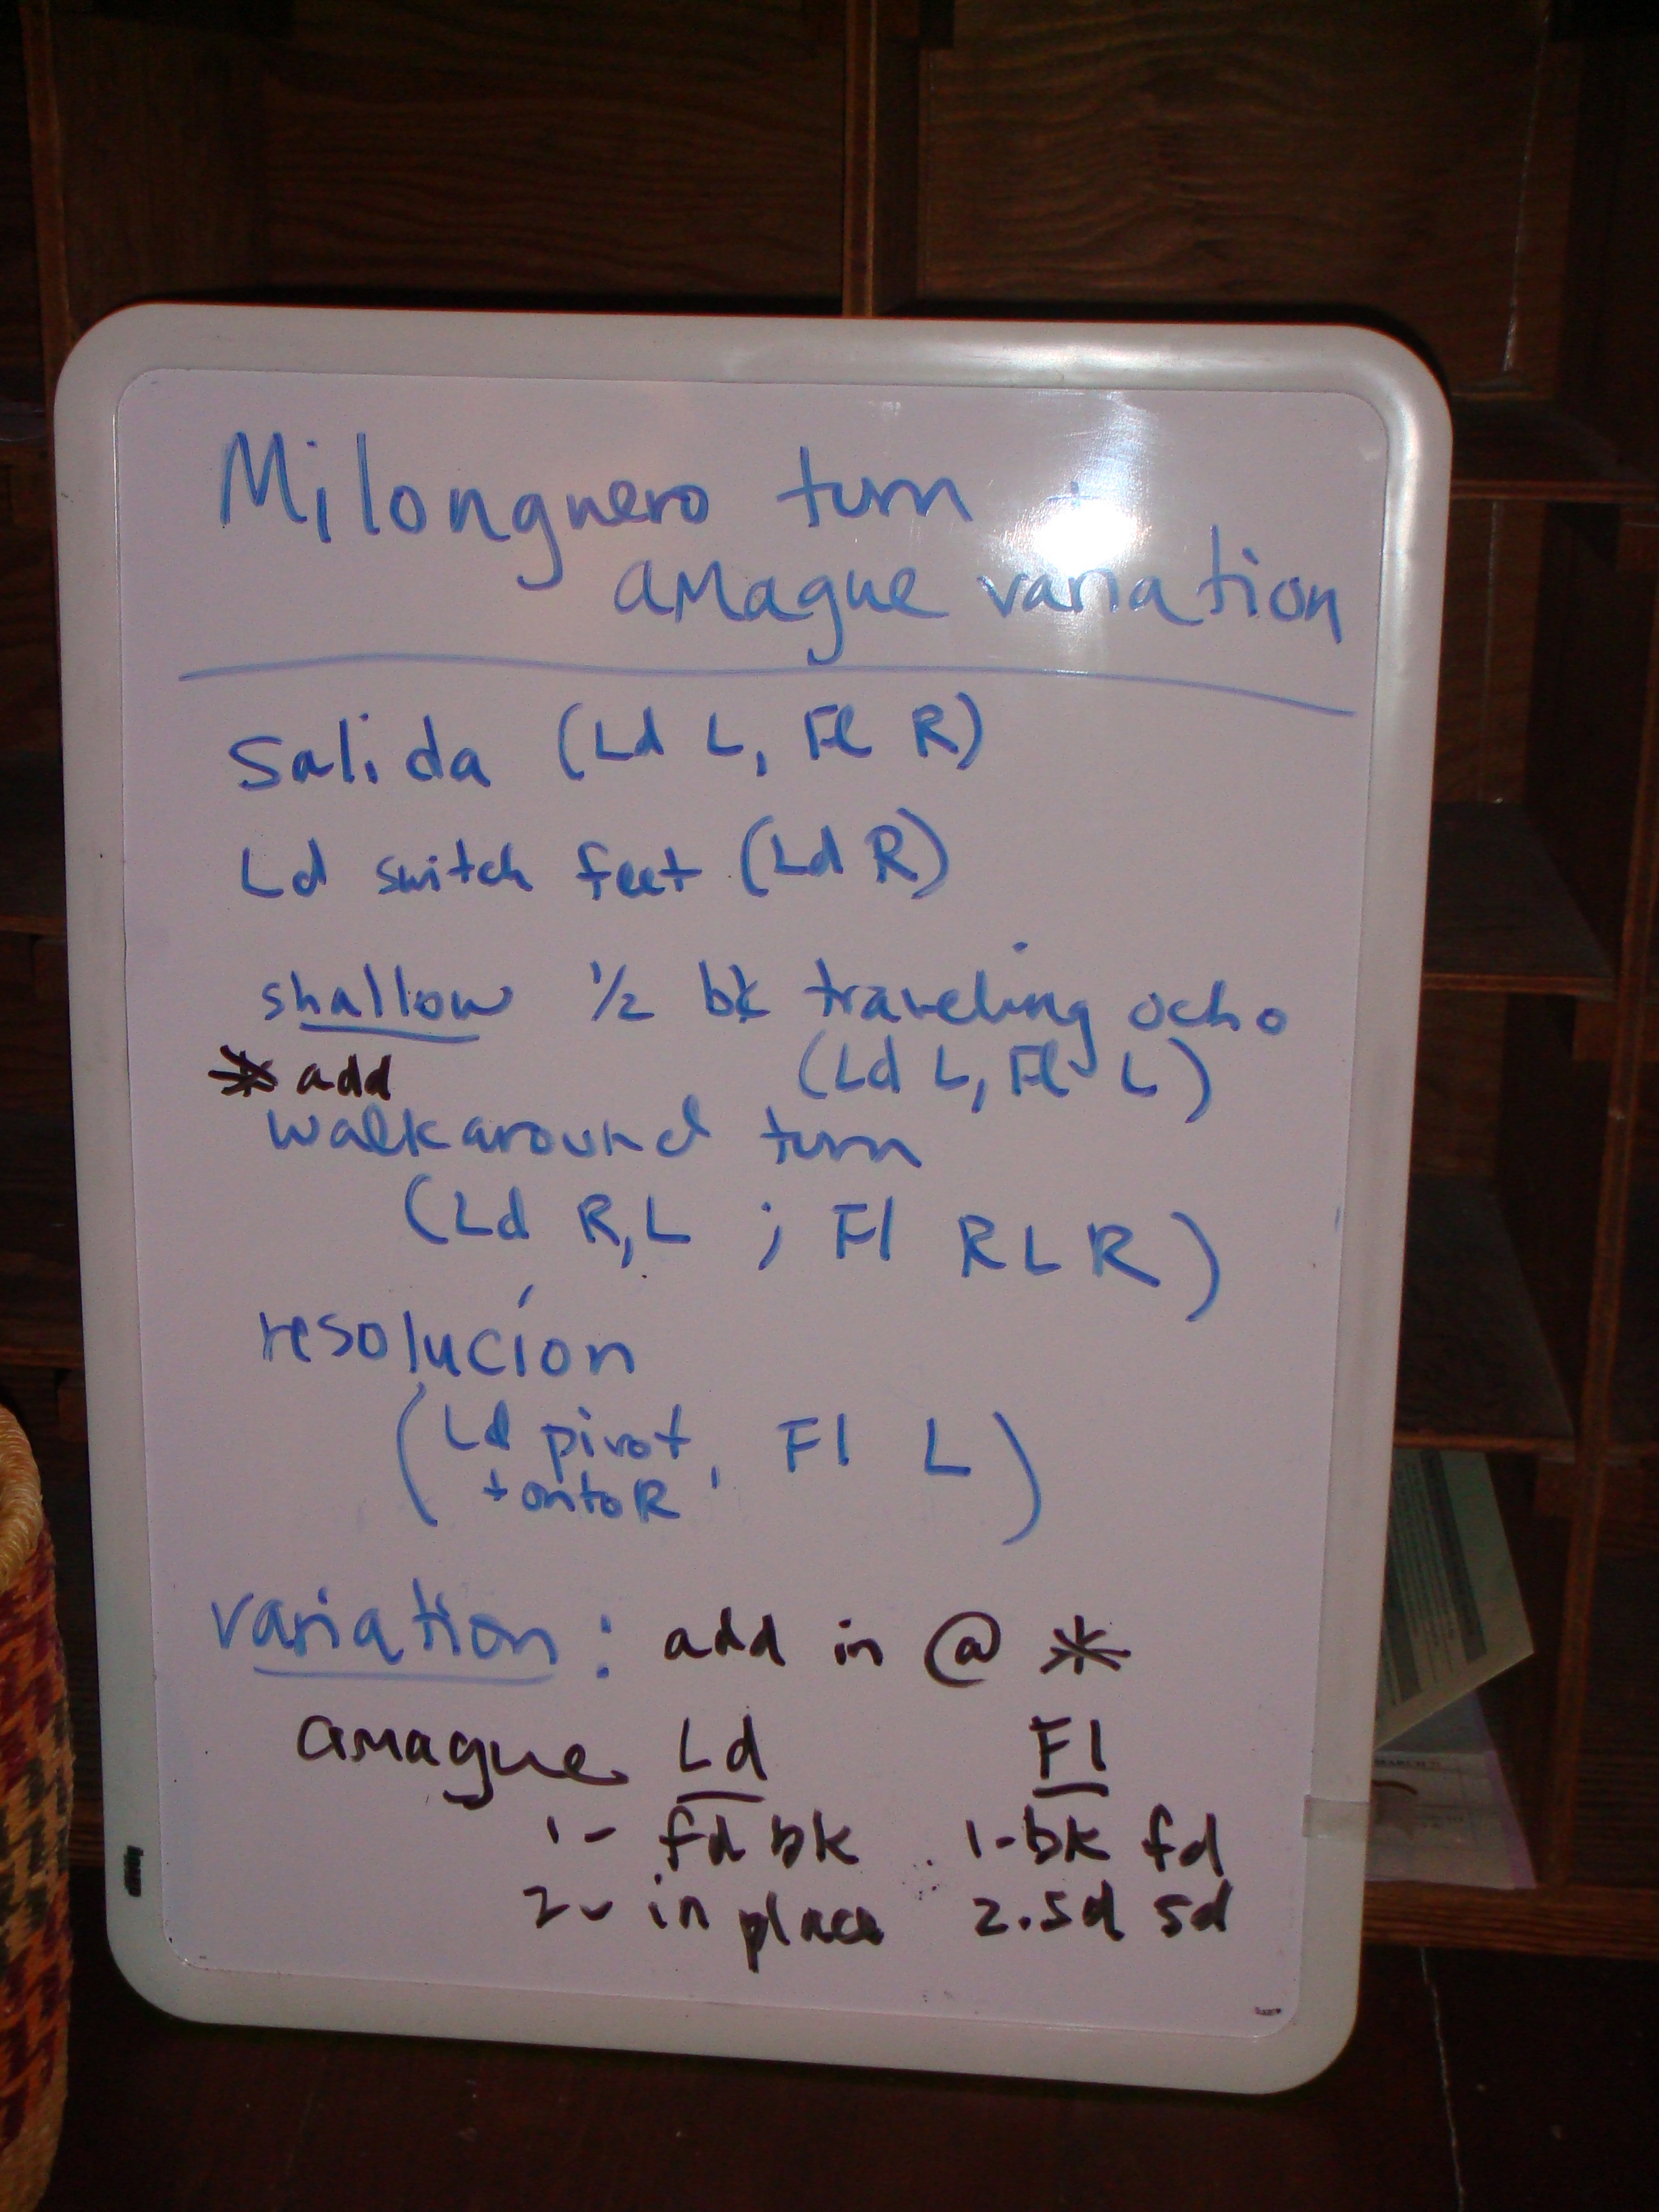
And here is the noteboard for the combination:

Milonguero turn with amague 1

Thanks for being patient, everybody!  If the movies don't work, let me know (it let me play them).  I'll gussy up the process once I get used to doing this :-)   Thanks Rich for the camera work!

New classes starting!

The next session of classes starts 3/31 and 4/4 @ the Om Studio, 14 NE 10th Ave. in Portland:

  • Beginners: 6 PM Thursdays (3/31)
  • Intermediate: 7 PM Thursdays (3/31)
  • Advanced intermediate: 8 PM Thursdays (3/31)
  • Advanced: 8 PM Mondays (4/4)

The cost is $60/6 weeks, or $12 drop in per person.

Pland_tango_apr-may2011

Tango Fundamentals

The 6 PM class is a class for beginners, or anyone who would like their dance to look more like Buenos Aires style tango. We work on technique for walking, turning, changing directions, pausing (adornos, too), as well as a few other basic steps, depending on the speed the class works at. My classes are a bit different than run-of-the-mill tango classes: we play games with music, energy, balance, etc., that allow you to gain an understanding of tango very quickly. I encourage correct body alignment and use of the body structurally to find your tango. I also think that improvisation, energy and fun should be a part of every person's tango, right from the first class.  If you need survival skills for the dance floor, this is the right level for you!


Creating the Magic

The 7 PM class is a class for continuing to develop an elegant, strong dance. I introduce new figures gradually, focusing on traditional, close embrace movement that can immediately be transferred from class to the dance floor. Again, balance, breath, embrace and musicality are ways to approach new movement, not just "fancy parts" to add in after the step is memorized :-)  When you walk out of class, you will be able to use what you learn right away on the dance floor. 


Taking it to the next level

The 8 PM class is focuses on musicality, improvisation, elegance--making the dance your own.  Often, we work on similar moves to the 7 PM class, but add details that challenge a more advanced dancer.  Musically, I alternate six weeks of moves that work well in vals/tango with moves that work well in milonga/tango (yes, many are good for all three :-)). If you already know moves, but want to look/feel better on the dance floor, this would be a great class for you.


Tango Alchemy

The Monday night advanced class is for dancers who have either already taken my other three levels, or who have reached an advanced level already and would like to polish their technique, learn new figures to enhance the dance, and build musicality. If you are not sure that you have a high-enough level for this class, please bring a partner along so that you can work at a slower pace, if needed. :-) This is a "one-room-schoolhouse" kind of class, with a wide range of dancers.  You should have three years or more experience for this class.


Classes are NOT just for people learning to lead!

Dance classes are not just "for the guys" or for folks who want to lead. In every class, I devote part of the class to technique for following. As my teacher Georgina Vargas says, "You have no excuse for looking bad on the dance floor, no matter how poorly you are being led." Please come to the appropriate level of class for your skill level; if you have danced for a while, but have not worked on styling with me, I request that you attend a lower level for at least a few weeks and learn the basics of the technique, or take a few private lessons before jumping in to do advanced moves.

See you in class!

Improving musicality through contrast: Milonga/vals class notes

This session of my intermediate/advanced Wednesday night class, we are looking at musicality through contrast. First, we learn a figure. Then, we try it to either milonga or vals music. We explore how many ways the movement can go with the music, especially in terms of slowing it down for adornos :-)  Then, we try the figure to the other music, and make adaptations to make the musicality flow better.

Not every pattern works well in tango, milonga AND vals. There are some moves I prefer in just one dance, or in tango and vals, but not milonga (or vals and milonga, but not tango). I am not in the camp that believes these dances have different moves. Yes, there are some things I tend to do more in milonga than tango, etc., but for me, the deciding factor is: does this movement work to this music? If it does, then I use it. After all, this suite of dances are street dances! Who says we have to follow all the rules?

I'm using a lot of figures that I've learned from Oscar Mandagaran and Georgina Vargas because THEY WILL BE HERE IN A MONTH!!!!!! Hopefully, this preparation will help those of you who are new to Oscar and Georgina, so that you can get optimal levels of information in one short week.

Good for vals: Salida with a change of direction

This figure is on Oscar and Georgina's wonderful Rhythmic Tango DVD (#4).

  1. Lead a parallel, regular side step to the leader's left.
  2. Lightly lead the follower to remain on the right foot by suspending her/him ON AXIS in place, while the leader shifts onto the right (into crossed system). The follower will feel the leader's chest shift sideways, but no one else should see this; it's slight. The leader's hips and chest change to the side in order to avoid pushing the follower over. The leader is now ready to walk to the outside track (on the follower's left side).
  3. Release the suspension, and step. Leader steps forward with the left; follower steps back with the left.
  4. Leader arrives on axis on left, with the right remaining behind as a "kickstand" to help maintain balance (if this is not working, remember that you can also bring your right foot up to the left to make your axis work better). The hips need to stay mainly oriented line-of-dance, but the torso will twist from left to right. The follower lands on the left, is led to pivot the hips clockwise, ready to step with the right.
  5. Leader takes a side step to the right, follower does a back cross step in the same direction. Suggestion: make this a forward diagonal, leaders! This reduces the angle the follower needs to pivot, making it simpler for a more beginning dancer to succeed in maintaining balance and looking good.
  6. Leader can switch feet in place while suspending the follower to exit in parallel, or stay on the same foot to exit in crossed system. Follower is "unwound" to prepare for a back left step, line-of-dance.
  7. Exit to steps 6-7-8 of the basic, or to the cross.

Places to mess around to make the musicality work: This pattern takes a nice 8 measure phrase to complete, OR it can take longer if the music tells you to SLOW down: it depends on the song. I like to suspend the follower after #1 and at #6 so adornos can happen, but I try to make this music-dependent.  One of my peeves is to see leaders trying to be dramatic by introducing slow and quick elements into the dance, but without listening to the music!! Believe me, the person you are leading usually prefers the dance to fit the music.

Same beginning, with a simpler pattern to move faster for milonga

The pattern above is HARD to do in milonga unless you have a follower who stays on-axis, on-balance. If you or your follower tend to fall over, . . . change it to make it more milonga-friendly.

  1. Do the same salida and switch systems/tracks as above, and the first step (#1, 2, 3 above).
  2. Walk a counter-clockwise circle (to the left), either as a regular circle, or as a "back step, back 1/2 ocho"--what I showed as I learned it from Jose Garafolo--that has a less even feel, but is funkier and feels great in milonga.
  3. Exit into whatever, moving line-of-dance (end of basic, to the cross, parallel or crossed system).

Musicality variations: You can do little corridas (quick quick slow) in this circle, or walk it in even counts. This also makes an elegant step for vals, by the way, where it can be slowed down and/or adornos added.

Vary the ingredients a little, get another move: boleo milonguero (Rhythmic DVD #6)

This move I prefer in vals (and tango), but several students showed great prowess in making this a milonga move. As a rule, I don't lead boleos in the milonga because few followers can stay on axis while pivoting that quickly, BUT that doesn't mean you can't lead it; be judicious in your choices.

  1. Do #1, 2 & 3 from above.
  2. Instead of a pivot to the leader's right and an open step, the leader leads a boleo on the ground (boleo milonguero) with the follower's pivot, rebounding into:
  3. a back right diagonal step on the right for the leader and a forward step with the right for the follower, through to the leader's right side.
  4. Same #6 and 7 as above.

Some notes on leading boleos, as these were new to some of you:

Leader:

  • must be on axis to lead a boleo
  • use back leg, knees one behind the other, for balance and stability
  • knees are relaxed, providing shock absorption
  • there is a slight suspension of the axis before leading the boleo
  • the boleo feels like a corkscrew motion, down around the axis and back up, if it is working correctly
  • hips remain forward, torso rotates
  • careful on foot placement: keep your V, and don't let your back foot/ankle turn in

Follower:

  • must be on axis
  • hips do the pivot work; don't swing the leg
  • knees meet and rebound, with the free leg rebounding back the way it came
  • the leader's torso leads the hip pivot, which leads the leg release (because of this, the "whip" of the follower's leg does not end when the leader rebounds, but slightly behind, like the end of a whip vs. the handle)
  • keep the feet in their V, so that the shape of the boleo remains constant and looks good (remember how inelegant it looked when I showed you the toes in version I was seeing in class? ;-) )
  • ankles, knees and hips are slightly flexed at all times for shock absorption, but make sure you don't sink in the boleo: this is a rebound, not a collapse

Again, nice places to add adornos are at the first side step and after the rebound of the boleo (so, at original #1 and #6-7 of the first move. In essence, because all these steps are built off of the same main structural beginning and end, the best place for adornos remains the same. Also, boleos can be different speeds. In vals, I like folks to lead me in a slower, sweeter boleo, rather than a WHAM! movement, allowing me time to really pivot well with my hips, and giving the boleo a more swoopy, vals feeling.

Introducing the quebrada as an elegant, stabilizing element of the dance

As I hear my next lesson knocking on the door, I'll finish here, and go over this step in my next blog entry. Stay tuned!

Creating your tango on the fly: paradas, drags and stepovers

One of the complaints I hear from intermediate dancers is that they don't know how to combine the moves they learn with their established habits on the dance floor. My preferred approach to new material is to integrate new moves immediately into the structure that dancers already use; and to understand material as a matrix of opportunities that suggest themselves while dancing.

One example of this: While turning, the follower takes a back cross step every four steps. What can you do with this step? Let's look at a few possibilities that are almost identical in setup, but differ in terms of which side of the follower's foot connects with the leader's foot; which foot the leader uses; and what the music says to do.

Back parada (stop) and pasada (stepover)

A parada (see most recent post) led on the follower's back cross step, or back parada, places the leader's foot in the way, blocking the next side step in the same direction of the turn. For example, if right turn is happening, the follower's left foot is blocked on the outside edge with the inside edge of the leader's right foot (to keep us all sane, I will only suggest one possibility here for the moment).

Two possibilities:

  1. Reverse the follower so that s/he steps FORWARD over your foot (so, a back parada and then a front pasada, or stepover).
  2. Do a sandwichito (little sandwich), bringing the leader's other foot up so that the leader's heels touch around the front of the follower's foot; then step back with the foot that originally stopped the follower; let the follower collect the heels around the front of your foot, and then step over (the version I described in the last post).

A drag (barrida or "sweep" or arrastre or "drag") and pasada

If you set up EXACTLY the same way as mentioned above, BUT place your foot on the other side (instep) of the follower, you can then perform a drag and stepover.

Let's say that we are turning to the right, and stopping the follower when the follower's left foot is near the leader and the right foot has done a back cross and is touching the floor.

Just like a parada, the drag is an illusion: it is led with the torso, and the leg drag simply adds another flavor to what is simply a side/open step of a turn for the follower. So, as soon as the leader's foot is in place, the leader's torso turns (here, clockwise, or to the right), and the leg accompanies that movement, so that the follower, the leader, and both legs arrive at the next point, at the same time.

This is a nice moment to incorporate the pasada, or stepover, perhaps with a pause for adornment before it.

Again, two possibilities:

  1. Drag with the foot towards which you are turning. In this example, use the right foot to drag. Your hips face the follower to make the leg drag easier. Then, the leader's torso twists to the right/clockwise, as do the hips and legs.  The leader ends up with hips and torso facing the follower (don't forget, keep your feet in a V, or you will fall over!)  The leader's right leg guides the follower to step immediately in front of the leader's new facing, and step over. 
  2. Drag with the opposite foot (i.e., to the right with the left foot). For this move, the leader must align the hips and feet facing the follower's NEXT step, while leaving the torso facing the follower's present position. Then, twist the torso to align with the hips and feet; and lead a stepover. This move is easier to keep one's balance, but harder to execute a pretty drag, as there is a tendency to push the follower's foot, instead of accompanying it with the leader's foot.

# 1 is easier to lead in close embrace (IMHO), while #2 is easier in open embrace; but don't limit yourself! Try both, to both sides, to see which one(s) you like, and use those.

This week in class, we'll cover some more ideas that are built off of back cross steps in the turn, and we'll also look at moves from the follower's side step. More drags, more pasadas, maybe even some ganchos! We'll see how far we get.

Buenos Aires basics (Popular tango moves 1)

The advantage to both leading AND following tango, is that I can steal moves from folks I danced with in Buenos Aires, and bring them home to YOU! My intermediate tango class on Wednesdays at the Interstate Firehouse Cultural Center (5340 N. Interstate, Portland, OR) will be learning these moves during this six-week session. We'll do a new one each week, so feel free to come drop in and dance!

Ocho cortado

There are many ways to do ocho cortado, but there are some fundamental elements that must exist for the ocho cortado (or ocho milonguero) to happen:

  1. Follower is led in a back-front rebound step (R foot back, L forward). This is ONE movement, like a basketball hitting the ground and returning. Does the ball stop for a moment at the ground? No! It flexes and returns (just like the follower's body).
  2. Follower is led to step through to the leader's outside track (leader's right) with the right foot.
  3. Follower is led in a side-side rebound step (left-right), ending in a front cross/close. This should have some circular motion around the leader to make the move easier for the follower and conserve space.

Notice that the ocho cortado is based on the follower's footwork! As the leader, I could hop up and down, as long as the follower gets these messages: rebound, step through, rebound, close. However, most of us prefer a bit more structure, so here are the leader's steps for the linear ocho cortado:

  1. Leader does a forward back rebound (left, right).
  2. Leader steps backwards with the left, while leading the follower through to leader's right side.
  3. Leader does a tiny rebound side-side, but most of the movement is circular, so that the follower's rebound goes around the leader, not away, out into space.
  4. Leader completes move by stepping in place (or near there, depending on the variation) with the right foot, ready to begin another pattern in parallel system (or doesn't switch and is in crossed system).

Most of the arguing about how to do the ocho cortado here in Portland centers around whether the ocho cortado should be circular or linear. THERE IS NO CORRECT VERSION; linear vs circular is a decision made on the dance floor, depending on the space available.

Common mistakes in performing an ocho cortado:

  1. Abandoning the follower's first rebound step to "make room for the follower" by tucking your free foot behind yourself. Your follower doesn't need you to get out of the way, s/he needs you to lead clearly.  Easy Fix: If you are going to make a circular ocho cortado, make sure the follower is completing the rebound (i.e., headed back towards you) before you pivot. No fix is needed for the linear version: if you were walking correctly, your foot is already behind your other foot, ready to receive the rebound.
  2. Pulling the follower to your side to make sure they know this is a forward step after the rebound. Your follower needs to stay connected to your center, not your shoulder, so this pulls the couple off balance.  Easy Fix: Check your first rebound. You get the momentum to carry the follower forward by completing the rebound. Don't think rock step; don't think check step: think REBOUND. Stay connected with your energy, but allow the follower's body to rotate against yours if she needs more room for her hips.
  3. Stepping open to catch the follower and send her back to the other direction to close. This usually makes the follower's "rebound" step into a yee-haw cowgirl, knees locked attempt to finish the step.  Easy fix: Make your own rebound step TINY (if you tend to fall over here, stand on both feet and just rotate!), and focus on making the follower's side-side rebound have a slight circular quality to it, around your center. Use the follower's momentum from the rebound to catch him/her and reverse direction.
  4. The enormous, yee-haw! version of the ocho cortado seems to start from a big, enthusiastic first rebound. A lot of guys have complained to me that they feel the followers charge through the middle (creating the "on the shoulder" orientation of the couple), and that they are forced to take a big step to catch the follower, in order to save the move. Yes, sometimes it is definitely the follower's auto-ocho-cortado that creates problems. But if you are leading, you get to choose to fix that!  Easy fix: take a small first rebound step. This should make the follower's forward step through smaller, AND result in a smaller side-side rebound. Whatever the energy of the beginning of the ocho cortado, the rest will mirror that. YOU are in charge, leaders!

Linear ocho cortado

Having said there is no correct version, full disclosure time. I prefer the linear version of this move as a follower. Too many folks have abandoned me in the middle of my first rebound in order to tuck their right foot behind and start turning, without having told me what to do! Yes, I can SEE where they want me to go. Am I being difficult in requesting that the leader LEADS me to dance? I don't think so. When I follow, I want to feel clarity, not see it :-)

As a leader, I don't even think what shape I need. I focus on making the first rebound the right size for my space on the dance floor, and then only move circularly when I have no space behind me. I rarely plan ahead for more moves, but let the end of the ocho cortado dictate what comes next (and yes, fourteen years ago, there was often a pause there because I couldn't figure out what to do next!). The energy of the dance makes the choreography, adjusted for space.

Where to find more information

An excellent source of review of some basic variations on ocho cortado is Oscar Mandagaran and Georgina Vargas' Rhythmic tango DVD. I like their explanation of the basic ocho cortado as well.  I think it's Chapter 11 on changes of direction, traspie timing and the ocho milonguero; and several chapters after that for the variations.

If you are coming to my class April 4th in Eugene, we'll learn three to five new variations to add to your dance. I just realized today that I'm teaching on Easter. Hope some of you show up anyway!